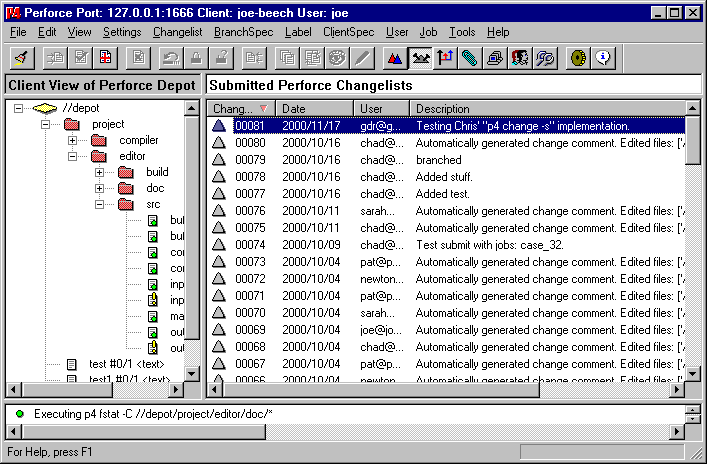
Figure 1. Viewing jobs assigned to you from the Perforce Windows GUI
Perforce Defect Tracking Integration Project
This is the Perforce Defect Tracking Integration 0.4 User's Guide.
Warning: The Perforce Defect Tracking Integration version 0.4 is a is beta test software, only intended for use during the beta program of the project. The software will be defective. We recommend that you do not rely on the integration in your organization. The integration may destroy your data. See the project web site <http://www.ravenbrook.com/project/p4dti/> for information about planned releases. We are very interested in your feedback on the beta. Please write to p4dti-beta-feedback@ravenbrook.com.
This is outline documentation, still in development.
[What is this document? Who should be reading it? Reqs 1-5. Section not written yet. LMB 2000-10-15]
If you need more information on using Perforce, please see the Perforce Command Line User's Guide, the Perforce Command Reference, or the on-line help system. If you need more information on using your defect tracking system, please see the manuals for the system or consult your defect tracking administrator.
If you're administering the Perforce Defect Tracking Integration (P4DTI), you'll need our Perforce Defect Tracking Integration Administrator's Guide. If you're installing the P4DTI, the Administrator's Guide is the place to start.
This section describes what the integration does and how it does it, and provides a summary of the benefits of installing the integration in your organization. It also contains some important information on how links work and on what happens if you do something in Perforce that's illegal in the defect tracker.
The P4DTI works by assimilating the job tracking system of Perforce and making the defect tracker's records appear as jobs. Perforce user can work with jobs more or less just as described in the Perforce manuals, and their changes will be reflected in the defect tracker. (See Chapter 10, "Job Tracking" in the Perforce Command Line User's Guide [Perforce 2000-10-09, chapter 10]).
Perforce has a mechanism for linking jobs to changelists, to allow organizations to record the work done for a particular reason. The P4DTI makes these links appear in the defect tracker, making it easy to see what was done or is currently being done to resolve a defect. (This information is useful for many other reasons too.)
See the Perforce Defect Tracking Integration Administrator's Guide section 2.2, "What the integration does" [RB 2000-08-10, section 2.2] for an overview of how the P4DTI works.
This biggest benefit of the P4DTI for developers is that it saves them having to switch over to the defect tracker to enter data about their changes and update the status of the issues they're working on. The P4DTI makes it easy to link changes to issues and keep them up to date.
This has a knock-on benefit for managers. The information in the defect tracker is much more likely to be accurate and up to date, because the developers can easily keep it that way. This makes tracking a development project much easier.
The P4DTI also has benefits for SQA and testers. It makes it easy to find out what has changed to resolve an issue, and to see which parts of the system have been affected, so that testing time can be directed effectively. It also makes it possible to find out which fixes have made it into a particular codeline or release.
Essentially, the P4DTI gives an organization all the benefits of Perforce's job tracking system combined with all the benefits of their chosen defect tracking system.
[Section not finished yet. LMB 2000-11-26]
Your organization should have a policy about which changelists to link with issues. For example, some organizations might want only the final check-in of a fix linked, and some might want all the intermediate stages linked. For information on your organization's policy, consult your manager or the integration administrator.
A changelist is only ever linked with an issue once. If you link it with the same issue again using a different keyword, the effect is just to change the keyword.
You can delete links between changelists and jobs in Perforce by using the p4 fix -d command. For details, see "Manually Associating Jobs with Changelists" in the Perforce Command Line User's Guide [Perforce 2000-10-09, chapter 10]. [These are mostly general points about links that we could document in overview. RB 2000-11-10]
If you do something in Perforce that the defect tracker doesn't allow — for example, if your action causes an error, or if it's forbidden by the DT's rules — then the replicator undoes the change in Perforce when it next wakes up, and sends you an e-mail message explaining what happened. The e-mail message contains your changes, so you won't have lost them.
[How likely is this? What sorts of things are illegal? How long will it take for the replicator to wake up? Should give them some sort of time estimate -- 10 minutes? An hour? It depends? How do they go about re-doing whatever they've done, if the way they originally did it is illegal? LMB 2000-11-26]
[We need to talk about what happens when you do something in Perforce that's illegal in the defect tracker (either an error, or forbidden by the rules that the DT has set up). The replicator undoes the change in Perforce when it next wakes up, and sends an e-mail message to the user explaining what happened. The e-mail message includes the changes that the user made, so they're not lost forever. Unfortunately, we can't let them know straight away. RB 2000-10-11]
[Section not written yet. RB 2000-12-06]
The development manager assigns a defect tracking issue to a developer.
The developer notices the issue in her list of jobs.
The developer analyzes the issue and updates the job. Her analysis is replicated back to the defect tracker and appears there too.
The developer checks out some files to work on to fix the problem, and links her pending work to the job. The link is replicated back to the defect tracker, and her colleagues can tell that the issue is being worked on, by whom, and where.
The developer finishes fixing the defect and submits her changelist. The job status changes, and this causes a corresponding chagne in the defect tracker, so that the issue is marked as "resolved" and moved on to the test group for verifying.
The test group check that the issue is resolved, and also run tests on the areas of the system that were changed to make sure they weren't damaged.
You can create issues in the defect tracker as you normally would. Each organization has its own policies for how to do this, so if you need instructions, consult your defect tracker administrator.
You can't create issues by creating jobs in Perforce.
[We don't support creating issues from the Perforce interface yet. We may never do, because it's very hard to validate all the fields that the defect tracker usually demands when a new issue is created. The P4DTI isn't really designed to deal with that part of the workflow. We might address this if we get requests for it during the beta program. RB 2000-12-06]
You can use the defect tracker to see a list of issues assigned to you in the normal way. In addition, your defect tracker may be configured to send you e-mail messages when issues are assigned to you. This section describes how to see the issues from the Perforce interface.
You can use Perforce to see the issues assigned to you. Each issue is represented by a Perforce job, and you can use the Perforce job commands.
Each job has a field containing the name of the user to whom it is assigned, and another containing its status. The exact name of these fields depends on which defect tracker you're using and how the integration has been configured for your organization. Ask your P4DTI administrator if you're not certain which field to use. This section assumes that the user field is called "Owner", the status field is called "state", and the "state" field is "assigned" when an issue is assigned for development.
Perforce version 2000.2 does not provide a way of viewing the list of jobs assigned to you from the Web GUI (P4Web) or any of the development environment plug-ins.
Follow these steps:
You can find issues using the p4 jobs command. For example, the command
p4 jobs -e "owner=spqr"
displays a list of jobs assigned to the user whose Perforce userid is "spqr". The command
p4 jobs -e "owner=spqr state=assigned"
further limits the output to jobs which have been assigned to you.
You can edit an issue by editing the contents of the job in Perforce. Your changes will be replicated back to the defect tracker. This is useful when you want to:
If you change the issue in a way that the defect tracker doesn't allow — for example, if your action causes an error, or if it's forbidden by the defect tracker workflow — then the replicator undoes the change in Perforce when it next wakes up, and sends you an e-mail message explaining what happened. The e-mail message contains your changes, so you won't have lost them.
To do this, just edit the job. Depending on your organization's policies, you may need to add some text explaining why you've done this. (If you have made changes and have already submitted them, you need to link them to the job using the method described in section 10, "Linking already completed work to an issue".
Perforce release 2000.2 does not provide a way of editing an issue from the Web GUI (P4Web) or any of the development environment plug-ins .
Follow these steps:
Figure 2. Editing a job using the Perforce Windows GUI

If you're using the Perforce command line, enter a p4 job command and edit the job appropriately. For example, the command
p4 job jobname
[Need to fill in this command with sample data and describe what it does. LMB 2000-11-19] For details, see "Creating and Editing Jobs using the Default Job Specification" in the Perforce Command Line User's Guide [Perforce 2000-10-09, chapter 10].
The P4DTI allows you to link your work in progress to an issue. This records your intentions and so has several advantages:
To gain these advantages you need to create a pending changelist containing your edits and link it to a Perforce job. The link will show up in the defect tracker.
You need to set a user jobview [Perforce 2000-10-09, chapter 10.5.1] to something like "owner=spqr state=assigned", where "spqr" is your Perforce userid. You can do this using either of the following methods:
p4 user to edit your user spec. Perforce release 2000.2 has no way of handling numbered pending changelists from the Web GUI (P4Web) or any of the development environment plug-ins, so this method is not available from those interfaces.
Follow these steps:
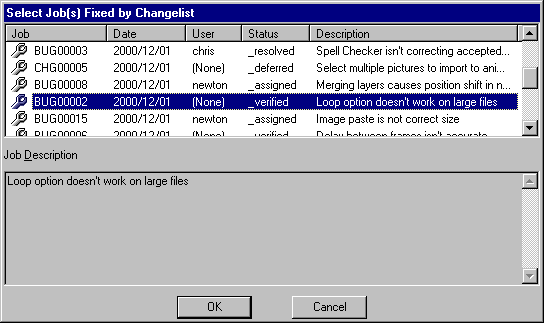
You can also add more links to jobs by selecting the changelist and choosing Changelist → Edit Spec… and repeating the steps above.
You can add more edits to the changelist later by dragging them from other changelists, or check out files for edit by dragging them from the depot view.
You can also add more links by following these steps:
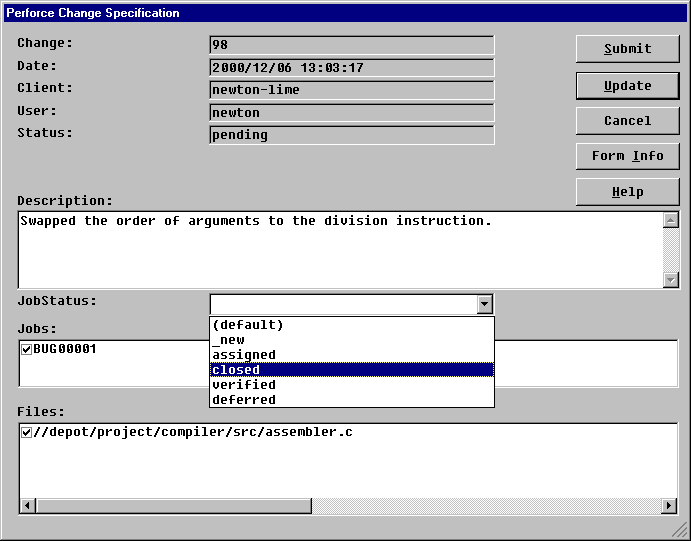
Note that the list of jobs in this dialog is not related to your user jobview. It's the same list as in Perforce Jobs pane (see figure 1).
Important: The status of jobs linked with Add Job Fix… will be set to "closed" when the changelist is submitted. If you need a different status, use Changelist → Edit Spec… instead.
You can delete links to jobs by selecting the link inside the changelist and choosing Changelist → Remove Job Fix….
Figure 3. The pending changelist pane in the Perforce Windows GUI

Figure 4. Creating a new changelist and linking it to jobs
Follow these steps:
p4 change -sYou can also add more links to jobs by using the command
p4 change changelistwhere changelist is the number of the changelist you created above.
You can add more edits to the changelist later by using the -c option to most Perforce commands, or moving them from other changelists using the p4 reopen -c command. [Need an xref to the Perforce Command Line User's Guide here. RB 2000-12-06]
You can also link pending changelists with jobs using a command like
p4 fix -s resolved -c 3004 ENH00034 BUG00094
or remove links with a command like
p4 fix -d -c 3004 ENH00034 BUG00094
where "resolved" is the status you want the jobs to change to, "3004" is the pending changelist number, and "ENH00034" and "BUG00094" are the jobs you want to link the changelist with.
When the pending changelist is submitted using a command like p4 submit -c changelist the status of the linked jobs will change as specified.
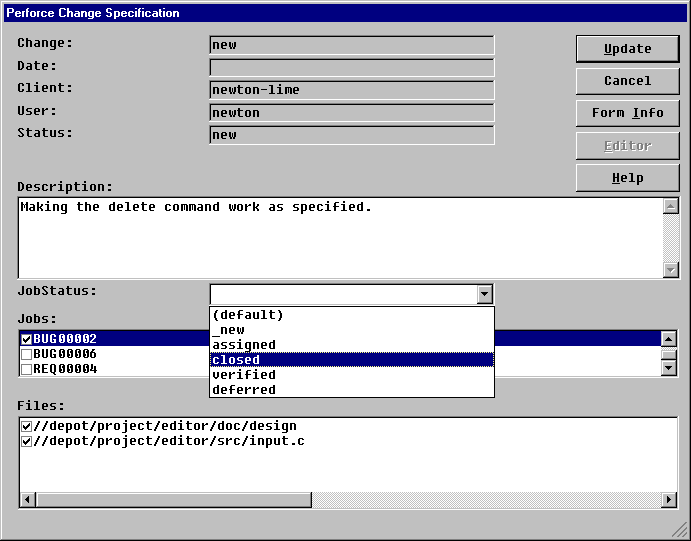
Figure 5. Selecting jobs to link when submitting or creating a change from the command line with a jobview set
# A Perforce Change Specification… Change: new Client: newton-skylark User: newton Status: new Description: <enter description here> Jobs: BUG00003 ignore # When -O3 is specified, some loo BUG00001 ignore # The division operator gets its BUG00002 ignore # There's no delete command Files: //depot/project/editor/src/buffer.c # edit //depot/project/editor/src/buffer.h # edit |
You can submit a change and link it to an issue without changing the issue status. This allows an organization to track partially completed work that's related to an issue, as well as the final submission that resolves it.
Note: Your organization's policy regarding links between changes and issues may not allow you to use this feature. For further information consult your manager or integration administrator.
If you're linking intermediate stages of changelists with issues, you probably don't want to change the status of the issue. The way to do this is to link the changelist with the issue as usual, but with the same status as the issue currently has. For example, in Perforce you can use the p4 fix command with the "-s" argument set to be the current status of that issue. When linking the final check-in, the "-s" argument will be something like "fixed" or "resolved" or perhaps "closed". [We probably need to explain this in overview somewhere, and include instructions about making this policy in the management guide. RB 2000-11-10 Done in overview. LMB 2000-11-26]
This procedure is exactly like the procedures described in section 9, except that, when fixing the job, you need to set the status to the job's current status, rather than to the resolved status.
Make sure your jobview is set before you follow the procedures in this section. See section 7.
Perforce release 2000.2 has no way of linking submitted changelists with jobs from the Web GUI (P4Web).
Follow these steps:
Figure 6. Selecting jobs to link when submitting from the Perforce Windows GUI with a jobview set
If the edits you want to link are on your default changelist, follow these steps:
p4 submit -sIf the edits you want to link are on a pending changelist, first edit the changelist as described in section 7.2. Then submit the changelist using the command
p4 submit -c changelistto submit it.
Follow these steps:
When you submit your changelist, the status of the jobs you left in the form is updated to match the JobStatus field and the changelist is linked with them with that status.
[The CodeWarrior (on Mac OS and Windows) plug-in shares code with the Visual Studio plug-in, but I'm not sure if the behaviour is quite the same. We need to find out. RB 2000-11-10]
Figure 7. Selecting jobs to link when submitting from Visual Studio

You can use Perforce to link a change that you've already made with a issue you've been assigned.
Note: The defect tracker's workflow may prevent you from linking to an issue that you don't own. If you try, the P4DTI will remove your link and send you e-mail. [This isn't true at the moment. And that's a bug. RB 2000-12-06]
For example, suppose you realize that a change you made yesterday will also resolve some issues you've been assigned to work on today. You can record this in the defect tracking system and get rid of those issues.
Perforce release 2000.2 does not provide a way of linking submitted changelists with jobs from the Web GUI (P4Web) or any of the development environment plug-ins.
Follow these steps:
Important: Due to a limitation in the Perforce GUI, this will change the status of all of the selected jobs to "closed". If you want to leave the status alone or change it to another value, you must use the command line. [This should be fixed by the beta release. RB 2000-11-10]
Simply enter a p4 fix command. For example, the command
p4 fix -s resolved -c 4096 ENH00023 BUG001239
links changelist 4096 with issues ENH00023 and BUG001239 and changes their status to "resolved". If you don't specify a "-s" option, the issue status is changed to "closed".
You can use Perforce or the defect tracker to see the changes resulting from an issue. This can be useful if you need to:
Perforce release 2000.2 does not provide a way of finding the changes resulting from an issue from the Windows GUI, the Web GUI (P4Web), or any of the development environment plug-ins.
Follow these steps:
Figure 10. Finding linked changes from the Perforce Windows GUI
Enter a p4 fixes command. For example, the command
p4 fixes -j ENH00034
will list the changes resulting from issue ENH00034. For details, see "Job Reporting" in the Perforce Command Line User's Guide.
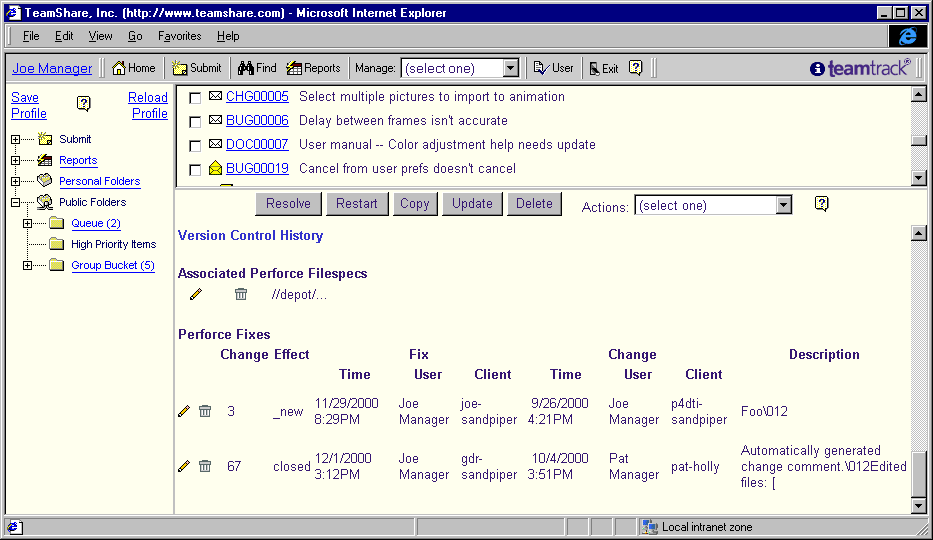
In TeamTrack, the changes linked with an issue appear in the Version Control section of the case form (see figure 11). If you can't see the Version Control section, follow these steps to display it:
[By the beta we hope to link the changes back to a web interface to Perforce, so that the user can find out more about them. RB 2000-11-02]
Figure 11. The changes linked with a TeamTrack case
You can use Perforce to see the issues linked with a changelist.
Perforce release 2000.2 does not provide a way of finding the issues linked with a changelist from the Web GUI (P4Web) or any of the development environment plug-ins.
Follow these steps:
Figure 12. Finding linked issues from the Perforce Windows GUI
If you're using the Perforce command line, enter a p4 fixes command. For example, the command
p4 fixes -c 4339
finds the issues linked with changelist 4339. For details, see "Job Reporting" in the Perforce Command Line User's Guide.
You can use Perforce to find out which files were changed in order to fix an issue.
To do this, you first need to find out the changelists linked with the issue, as described in section 12, "Finding the issues linked with a change".
Perforce release 2000.2 does not provide a way of finding files that were checked in for an issue from the Web GUI (P4Web), or any of the development environment plug-ins.
Once you know the changelists, follow these steps:
Once you know the changelists, you can use a p4 describe command at the Perforce command line. For example,
p4 describe 4339
outputs a list of the files that were checked in to fix the issue and the diffs for those files.
[It would be nice to provide a script for this, rather than asking the user to iterate over the changelists. RB 2000-12-06]
For details and more options, see Chapter 11, "Reporting and Data Mining" in the Perforce Command Line User's Guide [Perforce 2000-10-09].
You can use Perforce to find the issues linked with particular files. This can be very useful for finding out which issues have affected files in the past.
Perforce release 2000.2 does not provide a way of finding issues linked with files from the Windows GUI, the Web GUI (P4Web), or any of the development environment plug-ins.
Enter a p4 fixes or a p4 jobs command. For example, the command
p4 fixes //depot/foo/bar/*.c
will list the links and changelists for the files with a ".c" extension in the "/depot/foo/bar" directory, and the command
p4 jobs //depot/foo/bar/*.c
will list all the issues that have been linked to all the files with a ".c" extension in the "/depot/foo/bar" directory.
For further details and more options, see "Job Reporting" in the Perforce Command LineUser's Guide.
[We don't plan to support this directly from the DT, because the DT doesn't know which files have changed, only the changelist numbers. The way to do that will be to follow a link from the DT interface to a web interface to Perforce. RB 2000-10-11]
You can find out which issues you're working on, provided that you've been linking your work with issues as described in section 7.
This is useful when, for example, you are resuming work on a project after a few days away and can't quite remember which issues you were last working on. (If you want to find who's working on an issue, or issues you were working on in a different workspace, see Section 16.)
Perforce release 2000.2 does not provide a way of finding issues being worked on in a particular workspace from the Web GUI (P4Web) or any of the development environment plug-ins.
Follow these steps:
You can find out what you were working on by using a combination of the p4 changes and p4 fixes commands. For example, this command
p4 changes -s pending | grep username
finds your pending changelists. The command
p4 fixes -c changelist
then shows the issues you were working on in that changelist.
[It would be nice to provide a script to do this. RB 2000-12-06]
You can find out who's working on an issue and in which workspace, provided that they're linking their work with issues as described in section 7.
This is useful when you know that someone is working on an issue but you don't know who or where their work is — they might be on vacation, or have left the company, or perhaps it's you and you've just forgotten all about it. (If you want to find out which issues you were working on in a particular workspace, see Section 15.)
Perforce release 2000.2 does not provide a way of finding the workspace in which a issue is being worked on from the Web GUI (P4Web), or any of the development environment plug-ins.
[Section not written yet. It involves looking at the "Fixes" section of the job in the Job description window (see figure 10). Unfortunately you can't see the difference between pending and submitted changelists there, so you have to also look at the Pending Changelists (other clients) list in the Pending Perforce Changelists pane (see figure 3), to see what's actually in progress, but you probably only have to check the highest numbered changelist in the fixes list. Anyway, that will tell you the user and client (workspace). RB 2000-12-06]
You can find the user and workspace by using a combination of the p4 fixes and p4 changes commands. For example, these two commands
p4 fixes -j BUG0743
p4 changes -s pending
will list the changelists which are linked to BUG0743 and the list of pending changelists. Any changelists which appear in both lists are work in progress, and this gives you the user and client (workspace) where the work is happening.
[It would be nice to provide a script to intersect these two lists, rather than asking the user to do it by eye. Or we could ask Perforce if they could provide p4 fixes -s pending. RB 2000-12-06]
[Not supported yet. It will involve clicking on the changelist, which will be a link to a web interface to Perforce. P4Web isn't up to the task, because it has no jobs support, so we must provide something else, or wait. RB 2000-12-06]
| [GDR 2000-05-03] | "Requirements and Use Cases for Perforce/Defect Tracking Integration"; Gareth Rees; Ravenbrook Limited; 2000-05-03. |
| [Perforce 2000-10-09] | "Perforce 2000.1 P4 Command Line User's Guide"; Perforce Software; 2000-10-09; <http://www.perforce.com/ perforce/doc.001/ manuals/p4guide/>, <ftp://ftp.perforce.com/ /pub/perforce/r00.1/doc/ manuals/p4guide/p4guide.pdf>. |
| [RB 2000-08-10] | "Perforce Defect Tracking Integration Administrator's Guide (version 0.4)"; Richard Brooksby; Ravenbrook Limited; 2000-08-10 |
| 2000-08-10 | RB | Created placeholder. |
| 2000-10-15 | LMB | Added section titles; copied in some use cases as comments. |
| 2000-11-10 | RB | Added scads of text with rough documentation of many of the use cases so that LMB can work on real documentation. |
| 2000-11-26 | LMB | Fixed Sections 4.5 and 4.6. Started writing Section 4.15. Started writing Section 2. |
| 2000-11-26 | RB | Changed "document" to "file" throughout. |
| 2000-11-30 | RB | Updated references to Perforce 2000.1 to 2000.2, now that the AG says to use 2000.2 |
| 2000-12-04 | RB | Added screenshots and text figures at various places suggested by LMB. |
| 2000-12-05 | RB | Added brief instructions for using the new Show Fixes button in the Perforce Windows GUI. |
| 2000-12-06 | RB | Corrected the instructions for "p4 submit" to "p4 submit -s" and removed unnecessary figures for the previously different "p4 change -s". |
| 2000-12-06 | RB | Added overview sections. |
| 2000-12-06 | RB | Complete re-organization of the manual into more logical steps. |
| 2000-12-07 | RB | Added table of contents. Renumbered figures. |
| 2000-12-07 | RB | Removed note about the "ignore" bug in "p4 submit -s" and "p4 change -s" as it's now fixed in the Perforce server level we require. |
[Section not written yet. LMB 2000-10-15]
Copyright © 2000 Ravenbrook Limited. This document is provided "as is", without any express or implied warranty. In no event will the authors be held liable for any damages arising from the use of this document. You may make and distribute copies and derivative works of this document provided that (1) you do not charge a fee for this document or for its distribution, and (2) you retain as they appear all copyright and licence notices and document history entries, and (3) you append descriptions of your modifications to the document history.
$Id: //info.ravenbrook.com/project/p4dti/version/0.4/manual/ug/index.html#8 $
Ravenbrook / Projects / Perforce Defect Tracking Integration